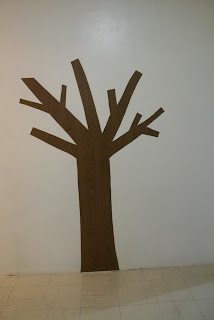
We have a long-ish hallway connecting the kitchen and
dining area to the rooms and it was not part of the
original plan to include it in our home make-over.
But as what usually happens to most of our DIY home renovation projects things don't always go as planned.
original plan to include it in our home make-over.
But as what usually happens to most of our DIY home renovation projects things don't always go as planned.
It took a while before we were able to decide on what color
to paint it with. After a whole lot of drama (mostly on my part)we finally settled on having good, old-fashioned white walls.
Although I am a fan of bare, minimalist, white walls I had to admit that our hallway ended up looking, well...really bare.
And becausue I am what I am, it had to be another DIY-er project. Also, I know that store-bought vinyl wall decals can be costly but you can make one for only a fraction of the cost.
All you'll need are the following:
1. Liner paper
(I got about a 2 meter roll of this wood grain pattern
from Handy Man for P130 but there are cheaper
ones available at Japan Home)
2. Scrap fabric
3. Cornstarch and water
4. Scissors
Procedure:
Step 1: Make a pattern of your design and cut.
This step is optional.
You may draw and cut your pattern straight on the liner paper.
Step 2: Transfer pattern onto liner paper and cut.
Step 3: Peel off backing.
(Do this little by little and carefully stick onto wall.
Use any blunt object -- as in a folded piece of cardboard to smoothen out wrinkles and remove air bubbles as you go.)
Use any blunt object -- as in a folded piece of cardboard to smoothen out wrinkles and remove air bubbles as you go.)
Step 4: Cut leaf-like patterns on scrap fabric.
(The colors and patterns don't necessarily have to match.
In fact, I even prefer that they don't!)
In fact, I even prefer that they don't!)
Step 5: Dissolve about 3 tablespoons of cornstarch to
1/2 cup water and stir thourougly in a pot over a low heat stove
until you get a slightly thickenned consistency. Let it cool.
Step 6: Soak fabric or apply paste directly by hand.
Step 7: Stick fabric onto wall.
Use a damp rag to smoothen out fabric and to remove or squeeze off excess paste.
 |
| There's a tendency for the darker fabric to show through from underneath but this lessens as the paste dries. |
"pasting" over our newly painted white walls.
They ARE literally newly painted and white after all!
The tutorial on fabric decoupage that I found was done over wood, but I trusted that it would work just as well on concrete.
I took a chance and I am completely satisfied at
how it all turned out.
All in all, this project only cost us the amount we paid for the liner paper. Everything else was practically free and
readily available. I added, however, a couple of birdhouses
that we bought along Silang, Cavite.
Personally, I think that not only do they give the tree
some form of dimension,
they also add a little more charm.
some form of dimension,
they also add a little more charm.
Don't you think?


wow! so nice sis! you are very creative! di ko kaya yan! really nice blog, by the way! :)
ReplyDeletesieggy
love this!
ReplyDeleteHi Irene,
ReplyDeleteThis is so pretty! Thanks for sharing :)
Wall decals are so expensive pa naman. Tanong lang, that cornstarch paste ? Is that easy to take off pag ayaw mo na ? Any reason why you used that ?
Thanks,
Jean
thank you all for your nice comments!
ReplyDeletejean, yes, the cornstarch paste is easy to take/peel off and thats one reason why i used that. the primary reason, however, is because i wouldnt have to spend more for the paste!
hi irene! iya here from N@W. i looove this one! Is it ok if i make a similar project (different design) for our daughter's playroom?
ReplyDeletehi, iya!
ReplyDeletesure, you may! absolutely! let me know how your project turns out
cool!
ReplyDelete- bert
Nice! ^^ very creative
ReplyDeletethank you, bert
ReplyDeletethanks too, mavie!
very nice, irene! ;-))
ReplyDeletethank you, girlie! glad you like it
ReplyDelete