Sunday, January 29, 2012

DIY Cardbboard Box Gas Pump

Turn an empty box such as this into...


...this.


All you'll need to do is

Step 1: cover it with paper
(or you may use sticker paper and electric tape) 

Step 2: Draw out details and labels with a marker pen 

Step 3:  Attach "nozzle" with "hose" onto the pump
(here I used a piece of tube that was part of 
Alonzo's plastic broom handle as the "nozzle" and 
strands of twisted straw as the "hose")

This kept the little boy amused for hours
(okay, I'm exaggerating a little here)


But I have to say it was a hit among the girls!

Friday, January 27, 2012

Sunday's Frugal Finds!

Alonzo received a lot of toys as gifts last Christmas. Mima even sent 2 balikbayan boxes full of toys (if you're Filipino you know what I'm talking about)! Most of his new toys are kept at my parents' house where he spends most of the day and the rest are at our house. We also kept the toys that are not yet appropriate for his age.

With my sister-in-law's permission, we'll be converting her room into Alonzo's playroom and mini library. No, we won't be doing anything extreme. Actually, we'll just be moving the beds against the walls and literally just bring in all the toys. 
 
We knew that we had a lot of sorting and organizing to do so off to Dapitan we went to purchase some baskets to get ourselves started. 


Would you believe that all these (nine baskets all in all!) cost us only P400?!

After less than an hour (we got there at around 8:30am) we were all done and the car's trunk was full. Hubby and I couldn't believe how much time we still had so we decided to make a quick stop at Cash and Carry for brunch. Of course, I also had to make mandatory(?) "inventory" at their Book Sale branch.


For only P240 we were able to get these for Alonzo's library!

Tuesday, January 24, 2012

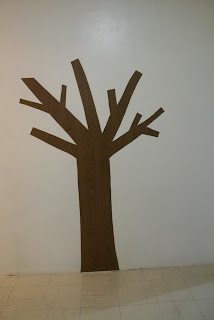
DIY Wall Decal

We have a long-ish hallway connecting the kitchen and
dining area to the rooms and it was not part of the
original plan to include it in our home make-over.
But as what usually happens to most of our DIY home renovation projects things don't always go as planned.   

It took a while before we were able to decide on what color
to paint it with. After a whole lot of drama (mostly on my part)we finally settled on having good, old-fashioned white walls. 
Although I am a fan of bare, minimalist, white walls I had to admit that our hallway ended up looking, well...really bare.


 I then decided to embellish the wall with decals.
And becausue I am what I am, it had to be another DIY-er project.  Also, I know that store-bought vinyl wall decals can be costly but you can make one for only a fraction of the cost.

All you'll need are the following:

1. Liner paper
(I got about a 2 meter roll of this wood grain pattern
from Handy Man for P130 but there are cheaper
ones available at Japan Home)
  
2. Scrap fabric
3. Cornstarch and water 
4. Scissors


Procedure:
Step 1: Make a pattern of your design and cut. 
This step is optional.
You may draw and cut your pattern straight on the liner paper.


Step 2: Transfer pattern onto liner paper and cut.

Step 3: Peel off backing.
(Do this little by little and carefully stick onto wall.
Use any blunt object -- as in a folded piece of cardboard to smoothen out wrinkles and remove air bubbles as you go.)


Step 4: Cut leaf-like patterns on scrap fabric.
(The colors and patterns don't necessarily have to match.
In fact, I even prefer that they don't!)  


 Step 5: Dissolve about 3 tablespoons of cornstarch to
1/2 cup  water and stir thourougly in a pot over a low heat stove
until you get a slightly thickenned consistency. Let it cool.   


Step 6: Soak fabric or apply paste directly by hand.

Step 7: Stick fabric onto wall.
Use a damp rag to smoothen out fabric and to remove or squeeze off excess paste. 


There's a tendency for the darker fabric to show through
from underneath but this lessens as the paste dries.
I totally understand hubby's apprehension about
"pasting" over our newly painted white walls. 
They ARE literally newly painted and white after all!

The tutorial on fabric decoupage that I found was done over wood, but I trusted that it would work just as well on concrete.
I took a chance and I am completely satisfied at
how it all turned out.   

All in all, this project only cost us the amount we paid for the liner paper. Everything else was practically free and
readily available. I added, however, a couple of birdhouses
that we bought along Silang, Cavite.
Personally, I think that not only do they give the tree 
some form of dimension, 
they also add a little more charm.
Don't you think?


Monday, January 16, 2012

Recycled T-shirt Scarf

It usually gets quite chilly this time of the year and
I've been saving this project for this time. Although I'm really not a "scarf person" part of my new year's resolution is to be
more open and give new things a try. It seems, however, that summer is about to creep in and it might just be a little silly for me to be wearing a scarf when its obviously sweltering.
My youngest sister from San Francisco will appreciate this scarf more and I'll probably just hand this down to her.

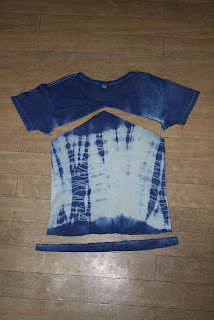
Anyway, for this project all you will need is an old t-shirt, preferably one with an interesting print or pattern.


Step 1: cut shirt accordingly.
The middle portion of the shirt is what you will be using for this project.
(Keep the top/neckline and sleeve portion for future crafts or
you could simply use this as a rag)


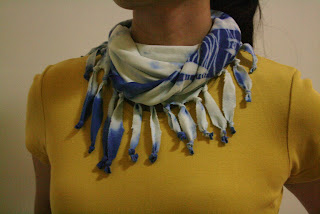
Step 2: make parallel vertical cuts on the "V" portion of the shirt for make fringes
Step 3: make knots to make the fringes more distinct 

Step 4: twist scarf to form a figure 8 and slide through your head


Ta-da!

Wednesday, January 11, 2012

Three Cheese Spinach Crisps

This is a little experiment that I made with the left over cheeses that we had from new year's media noche. 
I asked hubby to drop by the grocery and get some spinach.
Being the veggie repelling person that he is, he only got literally just a handful. After blanching and squeezing out the excess water,
all I had was a jackstone ball sized amount and
I was truly tempted to add magunggay as an extender! hahaha!
Good thing we had a small can of mushrooms. So I used that instead.
We also have a bottle of artichoke hearts which I think will go well with this dish but I'm saving that for another recipe.

Anyway, here's what I did:
step 1: saute minced onions, spinach and mushrooms in olive oil and season with salt and pepper 


step 2: scoop a small amount of the vegetable mixture
onto siomai wrapper

step 3: sprinkle cheese on top
(I used feta, roquefort and cheddar)


step 4: fold siomai wrapper over and seal
step 5: deep fry until golden brown


Enjoy!  

Tuesday, January 10, 2012

Clothes Pin Framed Mirror

Hubby and I started to redecorate the house around November last year. We intended to keep it low cost and DIY -- of course!
The kitchen was done just in time for my sister-in-law's visit from Australia and for our Christmas family reunion. 
I promise to show you the "before and after" photos soon. 

The living room is "still a work in progress" and it might
take some time before we could say that we are actually "done".
I was hoping that we could replace our existing sofa set
(I just hate how bulky and heavy it looks!)
but since the intention is to keep our home make-over low-cost
we'll be keeping the old sofa for now. 
What we've done for the living room so far, aside from the paint job,
was rearranging the furniture and replacing the
old, funeral parlor-like curtains.
Oh, what a big difference a change of curtains did to the living room!     

Anyway, the living room also had a small, bare wall. I have been endlessly thinking of creative and cheap ways to spruce it up until I discovered this blog haven for DIY-ers such as moi. 
Seriously, I wish I could claim credit for this simple and clever idea! 

Here's what you'll need:
1. wooden clothes pins --- lots of it! 
(I bought these at Japan Home for P66 per bag
and used a little more than 3 bags.


2. rounded mirror
(Instead of purchasing a ready-made one I just went to a local glass maker to cut for me a 20" diameter mirror. A smaller diameter mirror at SM costs about P2,000 while this one only set us back by P700!
Also don't forget to tell them to attach a hanging slot at the back)

3. glue gun

As for the procedure, there's nothing to it! Simply apply hot glue onto the clothes pins and attach them to the mirror.  


I really love how this project turned out.

It only took about 30 minutes to make and
who would guess that this cost us only less than P900!!!


Not only was it was fun, easy and cheap,
on our once bare wall now hangs a functional and stylish piece of art.

Monday, January 9, 2012

Reusing Toilet Paper Rolls

We've started taking down the Christmas ornaments both at my parents' house and ours. The garlands, Christmas lights, cardboard Christmas trees, gingerbread men and yup, even the
paper cupcakes have already been packed away and stored. The only thing left hanging is the appreciation wreath at my parents'front door (I don't feel like taking it out just yet).    

Anyway, speaking of packing away and storing stuff, here are useful ways that will make you think twice about disposing toilet paper rolls (even the ones used for foil, plastic wrap, etc.
--keep them all!).

Aside from creating play canned food or vintage planes out of them you may also wrap and store your Christmas lights around these cardboard tubes and prevent them from getting tangled.


Here (left) I used plastic wrap tubes but you can also insert toilet paper tubes together (right)

I also use them to hold documents and most of Alonzo's artworks!