Thursday, May 30, 2013

Memorial Day at Libingan ng mga Bayani

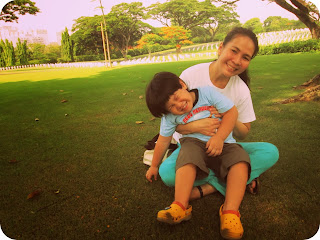
Last weekend all three of us trooped to the Libingan ng mga Bayani or Manila American Cemetery. I remember how we used to go there as a child and I was quite surprised that hubby has never even visited the place. Coincidentally, they were celebrating Memorial Day that day.      


Alonzo loved how really vast the place is and immediately asked permission if he could run around. We said that it's fine as long as he doesn't go near the crosses or the actual tombs. The guard told us that it is prohibited at the moment as they are setting up small flags beside each tomb for a ceremony.


 After much running, jumping and rolling around in the grass  (and pictorials, of course) the little guy got tired and thirsty that he asked if we could take him to Jamba Juice!
 

Saturday, May 25, 2013

Recycled Box Sari Sari Store

I'm sorry it has taken me so long to get this posted. This box play store has actually been around for about a year now
(super duper late post, I know!) and a photo of it has already appeared in this blog. I have received a few messages and inquiries about it but I kind of had some trouble looking for the photos from my files...sorry for the delay and I hope you'll find it worth the wait. 
 

Now that the rainy season has officially started your kids may just be forced to stay indoors. Keep them safe and entertained for hours playing “tinda-tindahan”!  
This form of pretend play can help enhance their imagination, sorting skills (classify items according to size, variety, etc…), counting proficiency or it simply trains them to become money savvy by teaching real-world economics.
 
Create a toy grocery store out of a large empty box with your kids. Surely, you won’t feel the need to have the kids plastered to the television or computer during the rainy season.
For this project you'll need:
one huge box
packaging or duct tape
scissors or cutter
paint
 
 
Step 1: Extend the flaps at the bottom and at the top of the box opening


 Step 2: Cut off 2 rectangles to make a door and a window
 

 Step 3: Support the flaps by gluing pieces of cardboard from the inside
 
 
  Step 4: Create a “ledge” on the window by cutting a folded piece of cardboard that fits over the window.
 
 
 Step 5: Secure this piece with glue and/ or packaging tape over the window.
 
 
Step 6: Create a shelf on the wall by cutting a rectangular piece of cardboard that is equal to the width of the wall.
(If you can find a box that that matches the dimensions of the wall you may use this instead and skip this step)
 
 
 Step 7: Make "flanges" to support the shelf by gluing small pieces of cardboard on the wall
 
 
Step 8: Create an awning by measuring a piece of a folded part of cardboard the same width as the facade with the window and about 12 inches in height. Add 3 inches more to the height and to that add another 2 inches on each side to make flaps. Cut and create a scalloped pattern
 
 
 Step 9: Place awing on top (opposite the direction of the folds to prevent it from drooping). Fold the flaps inward and secure with glue and/ or tape
 
 
  Step 10: Paint
Step 11: Use shelves to arrange pretend canned food (check this out, too!), toy milk or juice boxes, or other inexpensive “play food” that you might have such as empty boxes of cereal, empty tubs of butter, etc...
Step 12: Add details such as a “grocery store” sign, “open/ closed” sign and extra storage on the outside by laying basket in front to hold little crates or baskets or a pretend cash register.
 

Monday, May 20, 2013

DIY Shoe Semi Makeover

I recently rediscovered on old pair of white shoes from my closet. It was a pair that I used for hospital duty several years ago and have never been used since. I do remember planning to have it dyed into a different color before but because the pair had been shoved at the farthest and highest level of our shoe closet I completely forgot about it.
 
still brand new --
taken several years ago
when I still dilligently participated in
Project 365
 
Understandably, I found it looking a little beat up. So finally, I took it to Mr. Quicky and had it dyed. I chose to have it done in navy (after much deliberation). Also, I wanted to leave the tongue part of the shoe in its original white color -- kind of like a pair I had in the 90's. I didn't however trust the manong to do the job accordingly so chose to have it colored all over instead.
 
Bad call.
 
 
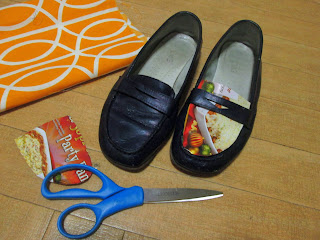
It ended up like an over used gradeschool shoe -- but in purple. Yep, apparently the navy colored swatch they showed me didn't exactly match the "navy" dye they used. I could live with the purple color but what I wasn't happy about was how "school girlish" "schoolmarmish" it looked.
 
I have seen several tutorials on how to cover shoes with fabric and have toyed with the idea but always chickened out. This was the perfect opportunity to try it out!  
 
Materials needed:
scratch paper
pencil
scissors
glue
fabric
 
Step 1: Use pencil and scratch paper to trace the "tongue: part of the shoe to make a pattern
 
Step 2: Use the pattern to outline the underside of the fabric. 
Make sure to lay the pattern on the center if your fabric has any form of print on it.
 
 
Step 3: Cut fabric.
Step 4: Wipe shoe with a dry cloth to make sure it is clean.
Then check how the fabric fits over the shoe.
 
 
Step 5: Apply a layer of glue over the shoe (I used Elmer's glue) and lay fabric over.
 
Step 6: Apply another layer of glue over the fabric and let it dry
    
   
Fancy, eh? 
 

Sunday, May 19, 2013

Last Call for Summer

Tomorrow is one of my sister's birthday.
Growing up, it somehow felt that days before her birthday marked the last few days of summer. As a child, I remember how it always rained on her birthday (I swear!) and some of her birthday parties had to be cancelled or postponed because of a storm.
Friends and classmates found it amusing (and quite odd)that I almost always say that it'll rain on the 20th of May
(Example: a school mate in post grad was planning a trip to Enchanted Kingdom and I was like, "Nako,wag sa Friday! Uulan non...May 20 yon, diba?")       
 
Anyway, Alonzo has been taking his day baths outdoors in his foldable tub
(the dog chewed up his inflatable pool last year and we haven't been able to replace it yet) and I randomly thought it might be fun to make a water bottle sprinkler for him.
 
 
This is a modification of the original procedure though.  Since this was an out-of-the-blue idea I didn't have time to look for  most of the materials needed, especially for an adaptor for the hose to fit into the water bottle.
 
Here's all that I used:
Hose
Empty plastic soda or water bottle
Nail
Duct tape
 
Step 1: Heat the tip of a nail over a stove or candle and use it to bore holes through the plastic bottle (instead of using a drill) 
 
Step 2: Remove the bottle cap and attach the end of a hose on to the opening (the hose didn't exactly fit on to the bottle so this is where an adaptor would be helpfull)
 
 
Step 3: Tape around the joint between the bottle and the hose
 
Step 4: Turn on faucet
 
I'll have to admit that I kind of semi failed on this one. The water didn't sprinkle out more than I thought it would. The tape around the bottle and hose held up pretty well and didn't leak at the junction. So I'm guessing we just didn't have that much water pressure to produce the same effect as in the tutorial.
 
 
  Well, Alonzo didn't seem to mind and had a lots of fun anyways.
Advanced happy birthday, sis!


Friday, May 17, 2013

Children's Book for Moms

This may be a late Mother's day post but I am excited to let you know about these 2 Filipino children's books for moms that I realy like.
 
 
This first one is "Hold on Tight" by Peachy Conception.
I bought this before I even became a mom. It is such an endearing and touching story about a mom who suddenly realizes that her son is all grown up.
 
The other book is "Inay, Inaay Ko!" by Segundo Matias.
The story revolves around a boy who wonders to himself why his friends always cry out for their moms. He suddenly finds himself shouting out for his own mom when his school gets all flooded and was put in danger.  
 
I tried to read both books to Alonzo but he said that the stories makes him sad. The little guy is becoming more and more expressive of his feelings right now. He tells us that riding his bike makes him happy and that he gets upset whenever his friends play with his toys without asking.
 
I have a couple of books lined up for me to read to him. At the moment he loves to stick to his favorites: "Guess How Much I Love You", "Chicka Chicka Boom Boom", "I Like It When", etc.. and I could not get past the first few pages of the books I want to introduce to him.   
"The Gruffalo" by Julia Donaldson and "Cloudy with a Chance of Meatballs" by Judi Barrett, he said, make him scared while 
Virginia Lee Burton's "The Little House", Don Freeman's "Curduroy" make him sad. I find it amazing how books could affect a child's emotion.
Hmm...I wonder what "A Wrinkle in Time" would make him feel?
 

Tuesday, May 14, 2013

Inked!

Alonzo got all curious and excited to see his dad's marked finger after voting. You may already know that purple is his favorite color so it wasn't surprising that he asked if he could also have his finger marked the same way. 
 
 
We simply dabbed his finger with a purple, non-toxic pen. 

Sunday, May 12, 2013

Mother's Day T-shirt Project

Last year I stencilled a shirt with a sillouette of my mom-in-law for Mother's day and I forgot to share with you here.


For instructions on how to make this please click here. 

Saturday, May 11, 2013

Reusing Alonzo's Diaper Bag

When we had to shop for a diaper bag (wow, this seems like such a long time ago!)I specifically looked for a style that doesn't look anything like a diaper bag and for something I could use after my son graduates from his nappies. 
 
We didn't have to look far as I immediately found what I wanted. Alonzo's Skip Hop diaper bag has served us well for the past 3 years.


 Surprisingly, it still is in pretty good shape considering all the abuse it had been subjected to. 
 

 It is what I use now for my laptop and other stuff!

Thursday, May 9, 2013

Toilet Paper Craft: Little Village

If you have been following my blog you probably know by now how much fun I have crafting with toilet paper tubes.
 
My toilet paper roll vintage plane together with my pretend canned food seem to be one of the favorites. (click here, too for another vintage plane version!) 
 
Here’s another toilet paper tube craft that you’ll also enjoy.
 
 
Materials needed:
Toilet paper tubes
Scissors
Glue
Fine point pen
 
Step 1: Fold tissue paper rolls lengthwise 2 times to form a “square cylinder”.


Step 2: Make 4 flaps on one end by making vertical cuts on each corner.


Step 3: Take 2 opposite flaps and cut each of them to form a triangle.


Step 4: Take the other opposite flaps and glue them together.


Step 5: Draw out details with a fine tip pen.
 
You may keep the design basic and simple or as elaborate as you want. Either way, you are likely to make more than one!

Wednesday, May 1, 2013

Orange, Beet and Spinach Salad

My sister made a large order of organic spinach from the ISIP market a few days ago. Spinach isn't something that I regularly find at the supermarket so I get a little excited whenever it is available. Here's a light and refreshing salad that's super easy to assemble.


Ingredients:
Spinach leaves
Beets (boiled and cut)
Orange slices
 
Dressing:
Dijon mustard
Maple syrup
Juice of an orange
Olive oil
 
Just eyeball and combine and mix all the dressing ingredients together, pour over salad and enjoy!