Sunday, June 23, 2013

Simple Joys

Alonzo and I had this conversation when we passed by a Jollibee billboard (the one with child kissing Jollibee) on our way to playhouse last week. You are probably familiar with the one I'm talking about as it is all over the metro. 
 
Our conversation goes this way:
 
Me: Alonzo, you look like the child kissing Jollibee
(while pointing at the billboard...and then realizing that the child is a girl! Hahaha!)
 
Alonzo: ...don't like...only Mama.
Me: What do you mean? You don't want to kiss Jollibee? Or do you want Mama to kiss Jollibee?
Alonzo: No! I only want to kiss Mama.
Me: Awwww....
 
My sister heard our conversation and sent me this photo which she took while I was away.


Thursday, June 20, 2013

DIY Pretend Fast Food Part 2

Wasn't yesterday's tutorial so much fun? Here's part 2 on how to create pretend fast food for the little kiddos (hubby enjoyed this craft project too but complained that it made him hungry)


To make pretend fries you'll need the following materials:
Several pieces plastic straws
Toilet paper roll
Crayons or markers
Scissors 
Step 1: Flatten toilet paper roll
 
 
Step 2: Fold one side of toilet paper roll inwards
 
Step 3: Do the same on the other side
 
 
Step 4: Cut off about 1 ½ inches from the other end of the toilet paper roll.
Step 5: Make a semi circular cut on one side.
 
Step 6: Use crayons or marker to decorate
Step 7: Cut plastic straws into different lengths and insert inside toilet paper roll


For the pretend apple pie repeat steps 1 to 3.
Do the same steps on the other end of the toilet paper roll.
Label and decorate with markers and crayons.
 

Wednesday, June 19, 2013

DIY Pretend Fast Food Part 1

It's no secret that I love creating toys. I also find so much satisfaction in making toys out of nothing. You can create these fast food toys with a little more than a few scraps of paper, toilet paper rolls, plastic bottle covers and crayons. 


  To make a pretend cheeseburger you'll need:

Brown paper bag
Green raffia (shredded paper or strips of green paper will do)
Red bottle cover
Yellow paper
Glue
Puncher
Scissors
Brown marker

Step 1: Cut off seams or sides of the brown paper bag and spread it out
Step 2: Crumple paper bag and mold or loosely fold towards the center to create a circular form
 Step 3: Glue seams together. Repeat to make other half of the “bun”.


Step 4: Cut strips of raffia and glue on to the underside of the “bun” to form “lettuce”.

Step 5: Glue red bottle cover to form “tomato”.


Step 6:  Cut yellow paper to form a square. Randomly punch holes to make “cheese”.

Step 7: Do with other half of “bun” and glue in place.


Step 8: Use brown marker to dot the top of “bun” to resemble sesame seeds.


Tadaa!

Sunday, June 16, 2013

Alonzo's First Day at Day Care

The little guy started day care this week. It's not exactly "school" yet but it was the first time he was without either me or his dad in playhouse.


I took this picture for posterity. Several posts at pinterest gave me ideas about presenting a photo of your child in his first (and last) day at school as a graduation gift. Hmmm...I'm definitely doing that!

Leftover Makeover: Pata Tim Noodles

You seem to like my Dad's pata tim recipe. And in honor of my dad and all dad's out there I'll be sharing a recipe concocted out of pata tim leftovers. 


Ingredients:
Leftover pata tim
Shitake mushrooms
Button mushrooms
Bok choy or chinese cabbage
(these look like baby petchay)
oyster sauce
canton noodles

Step 1: shred leftover pata meat and set aside 
Step 2: place remaining sauce in a pan and heat under medium fire
Step 3: add water (since there might not be enough sauce) and a little oyster sauce to adjust the taste
Step 4: add mushrooms and noodles
Step 3: turn off heat and add bok choy

Happy Father's day!
I LOVE YOU, PAPA!!!
 

Tuesday, June 11, 2013

Repurposing Empty Baby Food Jars

It's been a while since Alonzo had stopped eating baby food (he's 3 years old after all!)but we still have most of the empty bottles around. One of my first few posts for this blog had been about how we recycle empty baby food jars. Well, here's another way how we re-use them: 
 

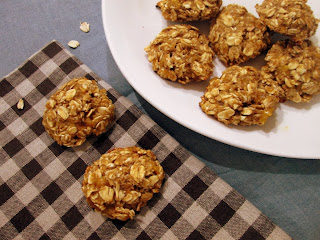
Healthy Oatmeal Banana Cookies

It is quite a struggle for me to keep my son from eating unhealthy foods. You may already know that yogurt had been his favorite snack for a while until the time he suddenly developed an unliking (is this a valid word?) or distaste for it. Little did I know that his preference had shifted towards ice-cream that his Lolo had been giving him behind my back! I could also only watch in horror (alright, I'm exaggerating a bit here) as my in-laws handed over a box of Krispy Kreme to Alonzo as pasalubong.
 
That's why I was more than delighted to have discovered this recipe.  I tweaked it a bit so that it requires only 2 ingredients: quick cooling oatmeal and bananas. Yup, that's it! The original recipe used 2 medium bananas. What we had available were bananas of the Lakatan variety that were on the small-ish side, so I used 4 pieces instead. 
 
 
Procedure:
Mash bananas and combine with 1 cup oats.
Drop 1 tbsp of the mixture on to a greased cookie sheet and place in a pre-heated 350 degree oven for 15 minutes. 
 

Enjoy!