Showing posts with label play things. Show all posts

Tuesday, April 22, 2014

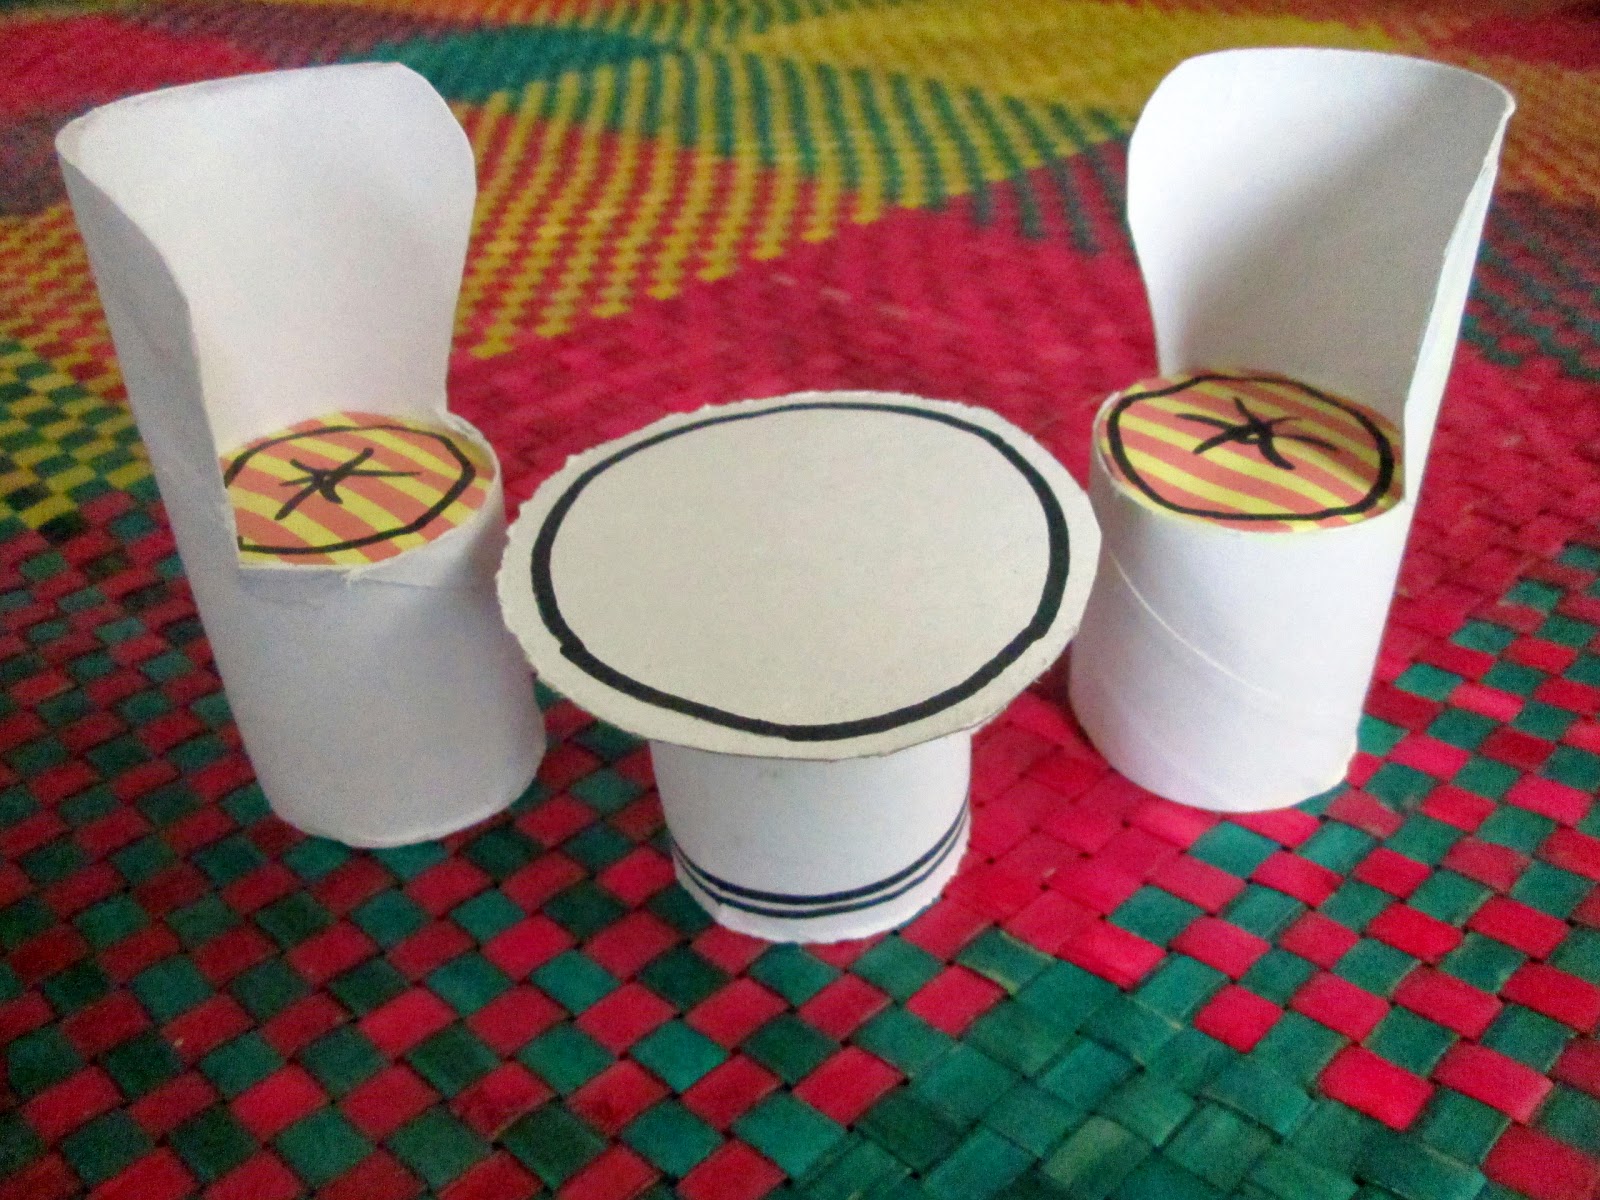
DIY Doll Table and Chair Set


Here's another amazing way to recycle toilet paper rolls into toys.   Turn those tubes into an easy-to-assemble set of miniature chairs and table that your kids (and dolls) would love. 


Material s needed:
Toilet paper tubes
Scissors
Cardboard
Old gift wrapper or any paper with a pretty print
Glue

Step 1: Cut tissue paper roll to make a “back rest” 


Step 2: Trace the end of the tube on a piece of cardboard to make a circle

Step 3: Cut to make a “seat”
Step 4: Use a small piece of gift wrapper to cover the “seat”
Step 5: Attach “seat” with tape
Step 6: Cut cardboard to form the top of the table
Step 7: Attach to toilet paper tube with tape 


I hope that this would inspire some DIY projects of your own!

Tuesday, December 10, 2013

Monday, October 14, 2013

Toilet Paper Roll Owls

 You may already know by now how much I love to "work" with toilet paper rolls. Over the weekend I created these flock of owls (did you know that they called a parliament?) out of toilet paper rolls in an attempt to get started with Halloween.
 
 
To make you'll need a couple of toilet paper rolls, marker pens and crayons or colored pencils.
 
Get started by following steps 1-3 of one of my favorite "trash to toys" projects. The next step is pretty much self-explanatory. Draw an owl and color.     


I don't think I succeeded in making these owls appear anything near scary-looking but I think these little guys turned out looking pretty handsome.


Thursday, October 10, 2013

DIY Play Lighthouse

Late last year I asked our local modista to save her empty thread spools for me.  She had a lot of those huge conical ones and since it was nearing the Christmas season then that I instantly thought of using those to create little Christmas trees. Eagerly, the modista gave me a small bag full of spools and told me to come back in a few months for more. Unfortunately, the spools never got their way out of the bag in which they came. Needless to say, I forgot all about them. It was only last weekend as I curiously peered through the clear plastic bag (carelessly left on top of a shelf which conveniently hides away my "trash") that I realized what were inside. It would have been nice to start my Christmas crafts this early (I haven't even made plans yet for Halloween!) but I decided to save my time and energy to prepare for the dreaded exam season. In case you don't know yet I'm back in school and am loaded up to my ears for things to submit for class (stress!!!).


So anyway, here's a little fun and quick craft that I did as I started to get restless over my statistics class report.  
  
 
For the lighthouse, you'll need an empty cone thread spool, plastic bottle cap such as a squeeze top Gatorade bottle cover (here I used the covers of an empty Mccormicks spice bottle and an empty cologne bottle). Glue the cover over the top of the spool and wrap colored tape diagonally around.  
 

While you're at it, make tiny origami boats and attach little flags by folding colored tape over a matchstick and glue.
 

Sometimes a little crafting can really help keep my nerves settled down.


Wednesday, October 9, 2013

Popsicle Stick Puppet


I found a box of tongue depressors (left over from a medical-dental mission)last Sunday. I've completely forgotten all about those. The last time I saw the box was for the chain choker that I made last year. Anyway, this project is so much easier than that. 

 
All you'll need are a couple of tongue depressors or popsicle sticks, yarn or chochet thread and marker pens to create these stick puppets.  
 
 
These puppets could also double as a bookmark.  

Saturday, September 7, 2013

DIY Toy Blender

Alonzo always gets excited whenever we visit his cousins. Not only because he seldom gets to see them but also because he gets to play with their toys! His absolute favorite of all his cousins' toys would have to be their little microwave and blender. He also likes to play with their pretend little stove oven but since he has one at home he doesn't get too crazy over it. 
 
Anyway, here's a random project that I made for the little guy. We came home from his cousins' house and he asked for his own pretend microwave and blender. He was satisfied by the clear, plastic shoebox that I presented as a microwave but I had to be a little more creative with his pretend blender.     
 
  Materials needed:
small box
old sippy cup
paper
scissors
bottle caps
glue
 
 
Step 1: Trace the base of the sippy cup on the box
Step 2: Use the tracing to cut a hole through the box
Step 3: Cover the box with paper


Step 4: Insert sippy cup through the hole
Step 5: Attach bottle caps with glue  

 
Instant toy blender...Tadaa!
 
 
I apologize for the poor quality photos. As I said earlier, this was a super random project and the photos were taken from my low-tech camera phone!  

Friday, August 30, 2013

Tuesday, August 20, 2013

Simple Grocery Cut Outs

I used to exchange (or barter) little grocery item cut outs from old magazines with Girlie before classes and during recess in prep. These were all neatly placed inside origami envelopes which we also made. This "transaction" of some sort was done before we both discovered Sanrio and before we both got hooked on collecting stationery. By the way, Girlie is my pre-school to high school classmate, car pool mate and later school bus mate...our dad's were also officemates.
Basically, she's the oldest close friend that I have. I remember we used to fight over a tiny Johnson and Johnson cotton swab cut out  -- apparently what we considered the most valuable item. hahaha!
 
Anyway, because I've been quite busy lately I promised to work on some projects I have in mind as soon as all the stuff from work and grad school gets settled.
 
I have an endless list of projects that I wish to start on
(sew new throw pillows for the living room, repaint the batibot chairs hubby and I salvaged from the backyard of the old house in Nueva Ecija, repurpose Mama's old curtain rod moulding into mini shelves, etc...). 
 
The extended weekend (yesterday, today and the holiday tomorrow) seem to be the perfect time to get crafty! Unfortunately, the weather does not seem to permit us to do any of our painting plans while Alonzo has either been following me around or asking me to be one of his "customers" in his pretend restaurant since yesterday. 


This is all the I have come up with. I secretly cut out food and grocery item photos from a grocery catalog and pasted them over card board while Alonzo busied himself "cooking" imaginary dishes for me.  
 
Not exactly getting my craft on, so to speak. But let me consider this as my mini tribute to Girlie, our good old times as kids and our friendship.
 

Cheers!
Thursday, June 20, 2013

DIY Pretend Fast Food Part 2

Wasn't yesterday's tutorial so much fun? Here's part 2 on how to create pretend fast food for the little kiddos (hubby enjoyed this craft project too but complained that it made him hungry)


To make pretend fries you'll need the following materials:
Several pieces plastic straws
Toilet paper roll
Crayons or markers
Scissors 
Step 1: Flatten toilet paper roll
 
 
Step 2: Fold one side of toilet paper roll inwards
 
Step 3: Do the same on the other side
 
 
Step 4: Cut off about 1 ½ inches from the other end of the toilet paper roll.
Step 5: Make a semi circular cut on one side.
 
Step 6: Use crayons or marker to decorate
Step 7: Cut plastic straws into different lengths and insert inside toilet paper roll


For the pretend apple pie repeat steps 1 to 3.
Do the same steps on the other end of the toilet paper roll.
Label and decorate with markers and crayons.
 

Wednesday, June 19, 2013

DIY Pretend Fast Food Part 1

It's no secret that I love creating toys. I also find so much satisfaction in making toys out of nothing. You can create these fast food toys with a little more than a few scraps of paper, toilet paper rolls, plastic bottle covers and crayons. 


  To make a pretend cheeseburger you'll need:

Brown paper bag
Green raffia (shredded paper or strips of green paper will do)
Red bottle cover
Yellow paper
Glue
Puncher
Scissors
Brown marker

Step 1: Cut off seams or sides of the brown paper bag and spread it out
Step 2: Crumple paper bag and mold or loosely fold towards the center to create a circular form
 Step 3: Glue seams together. Repeat to make other half of the “bun”.


Step 4: Cut strips of raffia and glue on to the underside of the “bun” to form “lettuce”.

Step 5: Glue red bottle cover to form “tomato”.


Step 6:  Cut yellow paper to form a square. Randomly punch holes to make “cheese”.

Step 7: Do with other half of “bun” and glue in place.


Step 8: Use brown marker to dot the top of “bun” to resemble sesame seeds.


Tadaa!

Saturday, May 25, 2013

Recycled Box Sari Sari Store

I'm sorry it has taken me so long to get this posted. This box play store has actually been around for about a year now
(super duper late post, I know!) and a photo of it has already appeared in this blog. I have received a few messages and inquiries about it but I kind of had some trouble looking for the photos from my files...sorry for the delay and I hope you'll find it worth the wait. 
 

Now that the rainy season has officially started your kids may just be forced to stay indoors. Keep them safe and entertained for hours playing “tinda-tindahan”!  
This form of pretend play can help enhance their imagination, sorting skills (classify items according to size, variety, etc…), counting proficiency or it simply trains them to become money savvy by teaching real-world economics.
 
Create a toy grocery store out of a large empty box with your kids. Surely, you won’t feel the need to have the kids plastered to the television or computer during the rainy season.
For this project you'll need:
one huge box
packaging or duct tape
scissors or cutter
paint
 
 
Step 1: Extend the flaps at the bottom and at the top of the box opening


 Step 2: Cut off 2 rectangles to make a door and a window
 

 Step 3: Support the flaps by gluing pieces of cardboard from the inside
 
 
  Step 4: Create a “ledge” on the window by cutting a folded piece of cardboard that fits over the window.
 
 
 Step 5: Secure this piece with glue and/ or packaging tape over the window.
 
 
Step 6: Create a shelf on the wall by cutting a rectangular piece of cardboard that is equal to the width of the wall.
(If you can find a box that that matches the dimensions of the wall you may use this instead and skip this step)
 
 
 Step 7: Make "flanges" to support the shelf by gluing small pieces of cardboard on the wall
 
 
Step 8: Create an awning by measuring a piece of a folded part of cardboard the same width as the facade with the window and about 12 inches in height. Add 3 inches more to the height and to that add another 2 inches on each side to make flaps. Cut and create a scalloped pattern
 
 
 Step 9: Place awing on top (opposite the direction of the folds to prevent it from drooping). Fold the flaps inward and secure with glue and/ or tape
 
 
  Step 10: Paint
Step 11: Use shelves to arrange pretend canned food (check this out, too!), toy milk or juice boxes, or other inexpensive “play food” that you might have such as empty boxes of cereal, empty tubs of butter, etc...
Step 12: Add details such as a “grocery store” sign, “open/ closed” sign and extra storage on the outside by laying basket in front to hold little crates or baskets or a pretend cash register.